

In today’s post, I’m going to show you exactly how to build local business pages with programmatic SEO. This method will save you a significant amount of time and money as you will be able to create multiple pages automatically. You can apply this method as well to other types of content that you have on a spreadsheet format.
And if you’re looking to create Rank and Rent websites, this is the approach you need. Personally, I’ve been implementing this strategy on one of my niche sites that was affected by the HCU and other Google updates. I’m using this method to recover traffic and boost my revenue.
Also, there are websites and directories making hundreds of thousands of dollars a month with this approach, so I’d like to show you step by step how you can do the same.
Check out these other guides on programmatic SEO and stay tuned for more.
What is programmatic SEO and how to use it to boost your marketing efforts.
Programmatic SEO with ChatGPT: A Real Case Study that Boosted Rankings
And now, without further ado, let’s dive into how to generate local pages with programmatic SEO.
Before we begin, what can you use programmatic SEO for?
Creating pages with programmatic SEO tools is great for anyone with an existing niche site looking to overcome traffic or revenue declines by the Helpful Content Update and the other Google core updates, as you will provide a different type of content that is not purely informational.
It’s also beneficial if you’re searching for a new monetisation method. Perhaps you’re currently leveraging affiliate marketing, or heavily relying on Mediavine or another advertising partner like Ezoic and you would like to add an additional business revenue. By the way, if you have suffered a decrease in your Ezoic revenue, check out this checklist on how to push revenue on Ezoic.
With Rank and Rent, you can achieve repetitive and ongoing revenue. This method is also useful if you have an existing Rank and Rent website. As an example, I’ll show you how to build a directory on my website, which you can follow along with. Additionally, it’s excellent for boosting topical authority. By focusing on a specific niche, you can demonstrate to Google that you are an expert in the topic and achieve that EEAT that we all need to rank our websites by proving to Google that we have genuine authority in the topic.
This focus can also help you build backlinks to your pages and, ultimately, boost your domain authority. You will need to contact clients further down the line, but we’ll get into that in due course.
It’s also great if you’re considering starting a Rank and Rent project and don’t know where to begin. This approach works well for new domains or aged domains with some existing authority. If you want to start a new project and delve into Rank and Rent, this is perfect for you too.
How to generate local pages with programmatic SEO – A step by step process
First of all, you need to identify your niche. Particularly if you don’t have a website already, you need to find keywords to target and ensure that you can actually rank for them.
Secondly, if this is a new project, create your WordPress site. If you have an existing site, you can skip this step. If you don’t have a website yet, this is a tuturial on what you need to create a site from scratch.
Thirdly, you need to install certain plugins: Custom Post Type UI and MPG (Multiple Pages Generator). These are completely free, at least in the way I’ve been using them.
The fourth step is to organise our data so we can upload it properly. We need to publish and create a Cornerstone or Silo page to establish our site architecture. Additionally, we need to submit our sitemap to Google so they can start crawling the pages. Let’s delve into each step.
Find a seed keyword
The first step is identifying our niche: this would be a particular business that you want to rank geographically. For example a hairdresser business or plumbing services. In the example of today we will be covering hairdressers in Spain.
The next step is finding keywords. What I recommend is typing in your main niche; for example, let’s say hairdressers, and then adding a location. If you’re in Spain, you should start with your largest or local city with the highest population, as this will give you the most keywords. I’ve done this with hairdressers (peluquerías), and I’ll show you how I got there. T
he keyword I used in the example below is “peluquerías Madrid,” which means “hairdressers Madrid.”
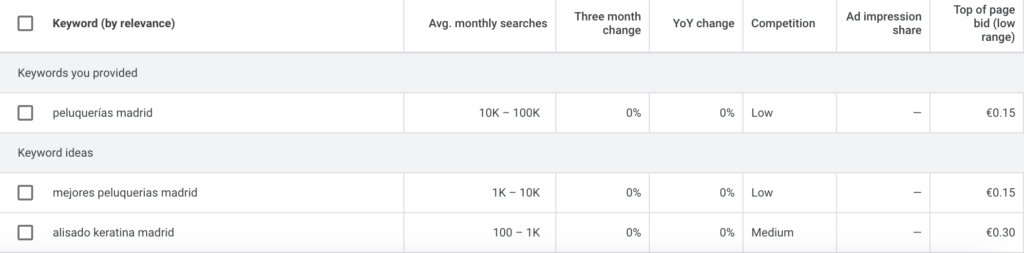
Here you can check the level of competition you can expect. As you can see, Madrid has some low to medium competition. Repeat this process for the main cities in the country to get an overview of the level of difficulty.
After this step, you should be able to decide which locations you want to target. In this case we will target all provinces in Spain (the first regional split after the country itself). Spain is divided into 50 provinces.
Please note that the CMS I will use for this step-by-step tutorial is WordPress.
Extracting programmatic data: Google Maps Data Scraper
To create pages with programmatic SEO, you need to gather data from somewhere. I recommend a tool called OutScraper. Specifically, I will be using the Google Maps Data Scraper.
You can input any category and brands you want, as it will search Google for those terms. For this example, I will use “beauty salon,” which is one of the options in the dropdown menu.
Keep in mind, the more information you extract, the more it will cost. Extracting data incurs charges when the number of queries or fields exceeds a certain limit. However, if you don’t need much data, it will be free. You will always see the price before downloading, so you can make an informed choice.
In any case, it is very affordable. It costs around $10 to extract about 20,000 records from Google Maps. Downloading 300 items for this tutorial was free. So, keep that in mind; it’s not too expensive. You then press ‘confirm,’ and the extraction process will start.
Once you download the data from OutScraper, you need to clean it.
You should end up with a Google Sheet that contains one row per city (in this case, I have only one city, Zamora). In that row, you need to include the fields that will populate the location pages. Include the information for each business in the same row and in the same order, one after another. It should look like this:
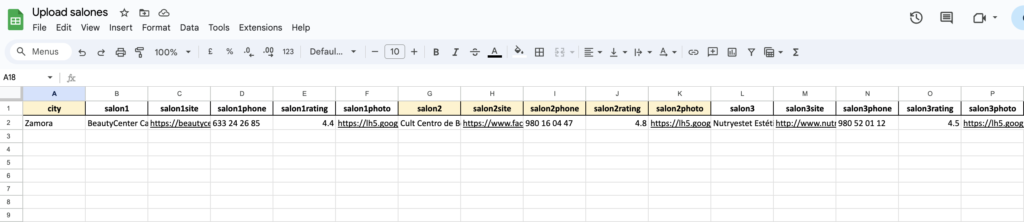
Now, we have a spreadsheet with the data ready. Each row represents a location, but for now, we are only working with one city.
We are going to copy the data to Google Sheets, make it available to everyone, and then copy the link. We are ready to upload the data.
The two plugins we need are CPT UI and MPG. I will quickly install them and show you what they are.
Setting up Custom Post Type UI
The first plugin is Custom Post Type UI. This plugin allows you to create a custom post type, enabling you to create a distinct section on your website. It’s completely free and easy to use.
1. Install and Activate: Install the plugin, activate it, and wait for it to complete the process.
2. Overview: After activation, you’ll see an overview of the CPT UI.
Next, press “Add/Edit Post Types.” We’re going to create a post type for hairdressers, but you could use this for any business, like plumbers.
Post Type Slug: Enter the generic name of the business. In this case, I am entering “hairdresser”.
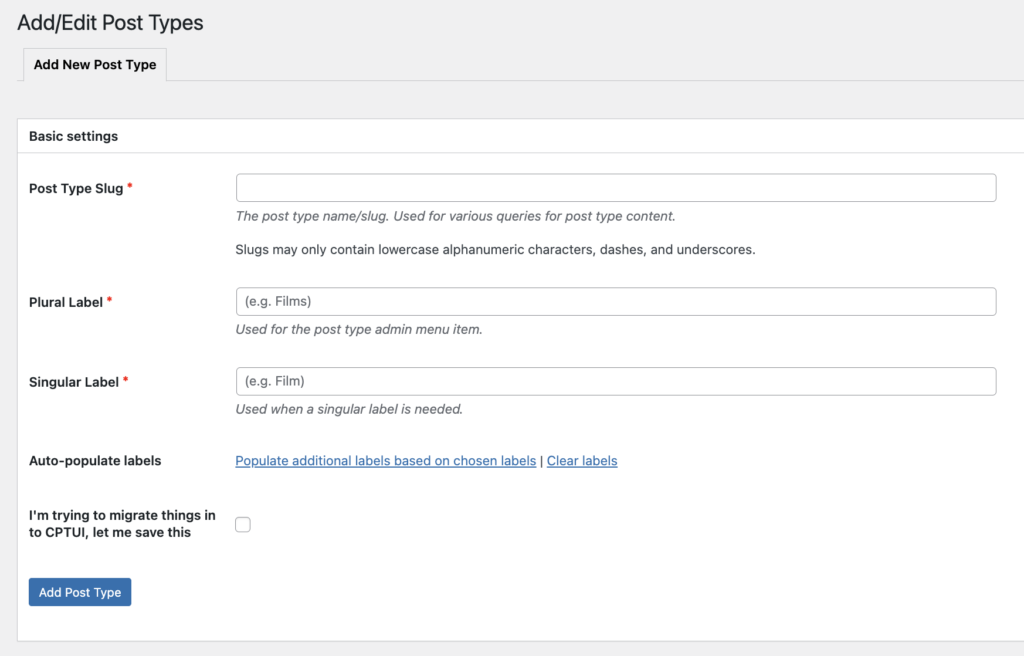
The plural label would be “hairdressers.” The singular label would be “hairdresser.” I recommend pressing the button that populates all the fields at the bottom. We don’t want it to say “My hairdressers,” so change that to “hairdressers” to ensure consistency.
You can leave the rest of the fields as they are; I wouldn’t modify them. One thing I would do is scroll down to the bottom and set “Show in Menu” to True. For Menu Position, I like to place it under the posts, so I choose position four. Show in Menu should be True. That’s all we need to do at this stage.
You can add support for available registered taxonomies if needed, but I’m going to leave that for now. Click on “Add Post Type.” Now, we can see “hairdressers” listed.
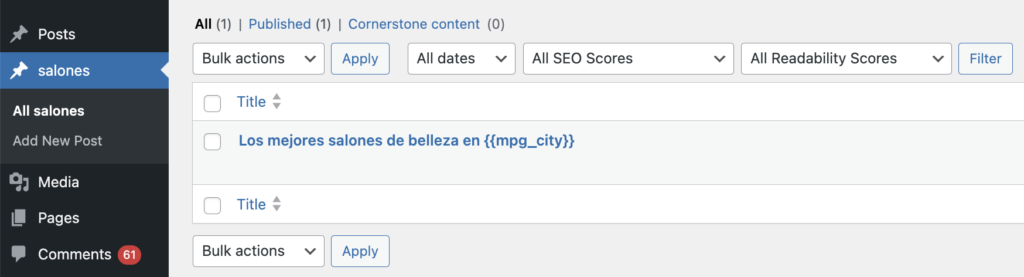
In the left-hand side menu, you will find a new item with the name you just created. In my case, it is “peluquerías,” which is Spanish for “hairdressers.” Click on “Add New” to create the template. This is where programmatic SEO comes into play, allowing us to create many pages.
We will add a title containing the placeholder for the location and the shortcode for the MPG plugin:
“Los mejores salones de belleza en {{mpg_city}}”
Then, we add an introduction, something like:
“¿Estás buscando los mejores salones de belleza en {{mpg_city}}, España?”
Next, add three columns for the three content areas and insert shortcodes as appropriate.
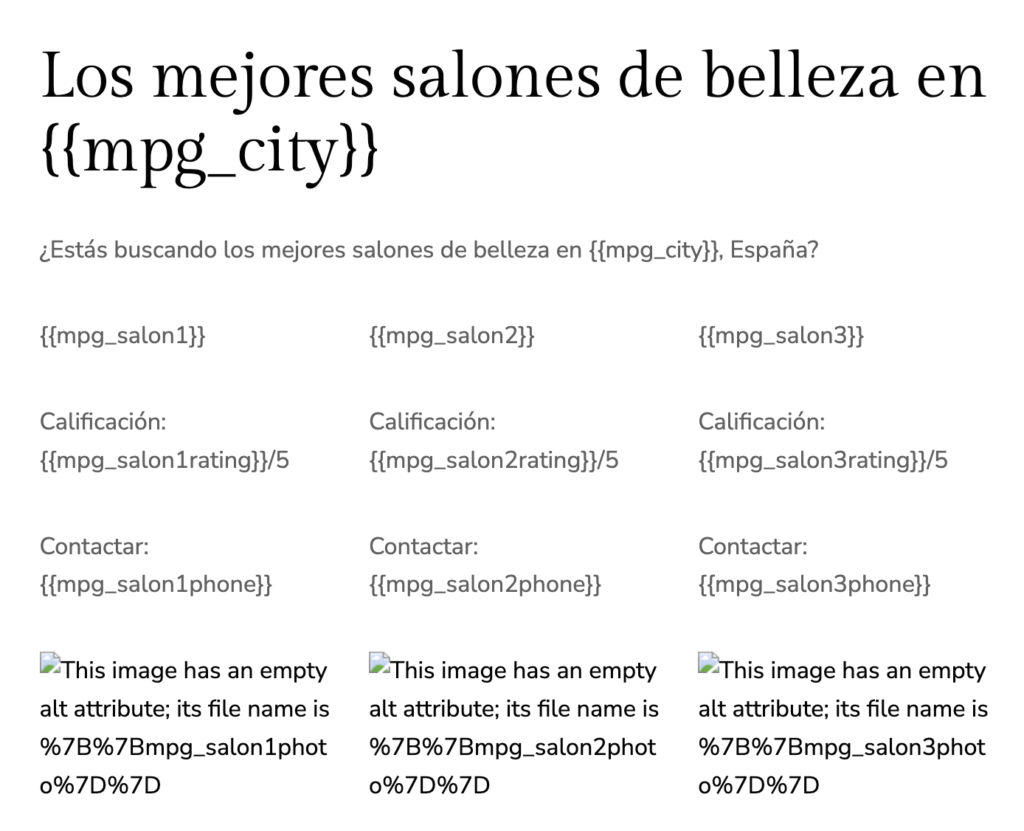
It is important to note that the AMP tag for MPG must be in lowercase, and the mapped fields must also be in lowercase and without spaces.
We could add a testimonial block. Imagine this is your template and your hairdresser page. You can build this out to be as beautiful as you like; it doesn’t really matter at this stage. Again, we can add various other blocks here. I used three columns for simplicity.
Now, we will publish this. This will be the template we use to build out all of our other pages and locations.
Setting up MPG
Next, we need to get MPG. It is free for one project; if you need additional projects, it does come at a cost.
I prefer MPG because, in my experience, you can create some really nice and highly visual designs with MPG using GenerateBlocks. Another popular option is WP All Import, which I found unattractive. Another one I tried is Bulk Page Generator – LPagery, but you can only work with three fields in the free version per page, which is not much. The paid version starts at $27 monthly. This is why I prefer MPG.
Now, you need to create the template page you want to use.
Create a New Project in MPG
Go to MPG and create a project. Click “Add New Project” and then “From Scratch.”
I would call this project “hairdressers.” In the template field, start typing the name of the page you just created. In my case, it will be **Los mejores salones de belleza {{mpg_city}}**.
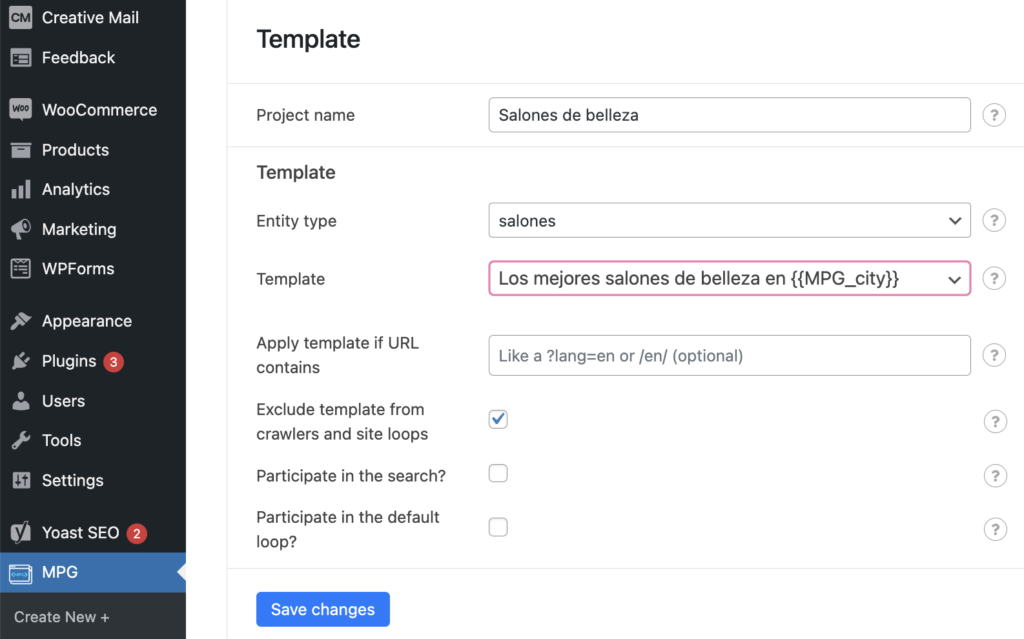
Then check “Exclude template from crawlers and site loops” and save the changes.
Creation of programmatic pages in MPG
Now, you need to use the cleaned version of the spreadsheet that you downloaded from OutScraper. Enter the URL for the Google Sheets document where the data is located. Make sure the link is available to everyone.
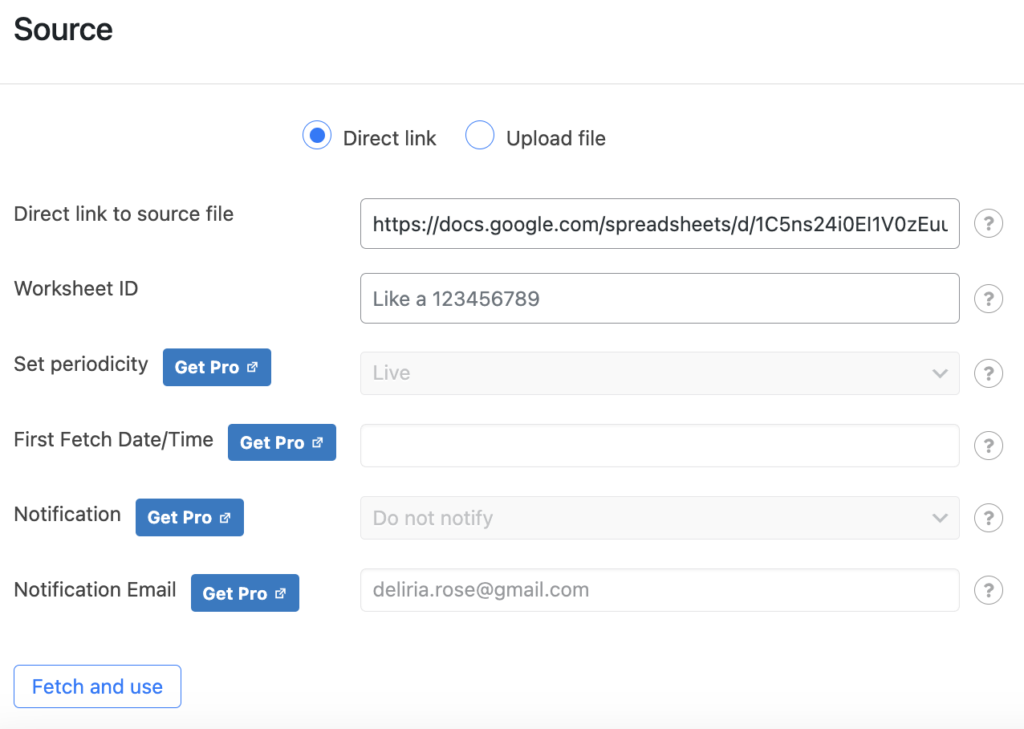
An important note here: When you update the shared Google spreadsheet for MPG you will need to enter the URL of the spreadsheet again and click on Fetch and use if you want the plugin to update any changes on the data.
Next, you can select how to generate the URLs for each of the pages created.
You will create one page per location (city). I recommend including only the name of the city in the URL, as shown below:
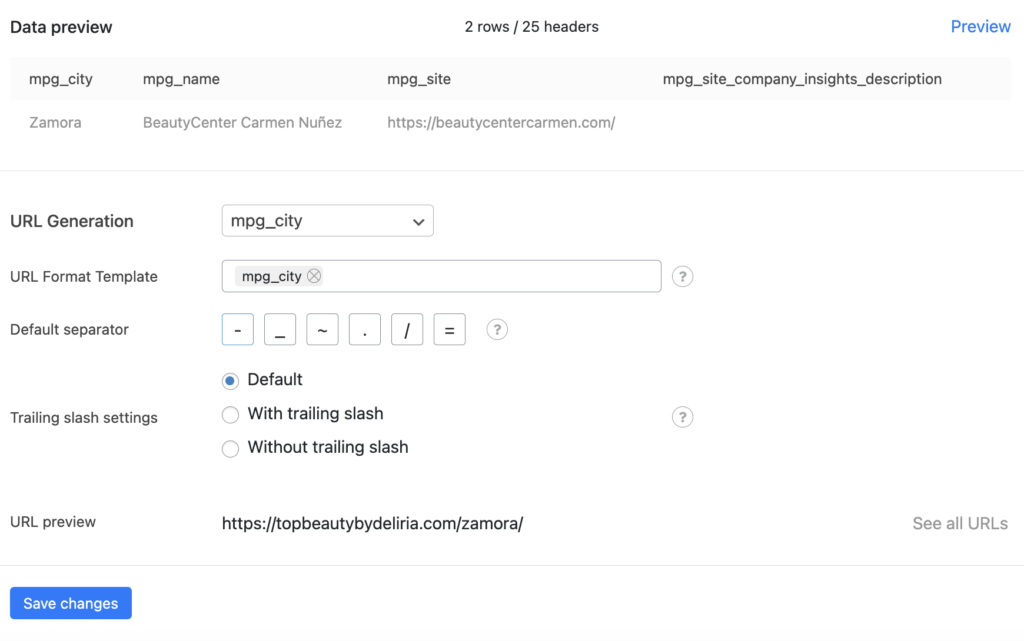
Click on “Save changes” and you will see that a URL for each location has been created.
If there are any mapping issues, you can go back to your spreadsheet and correct them. To edit your newly created pages, go to the new item in the menu created with Custom Post Type UI and click on “Edit.”
Then go back to the MPG plugin and just click “Fetch and Use.”
To view the new pages, go to MPG. Remember that you cannot edit them individually; you need to edit the template.
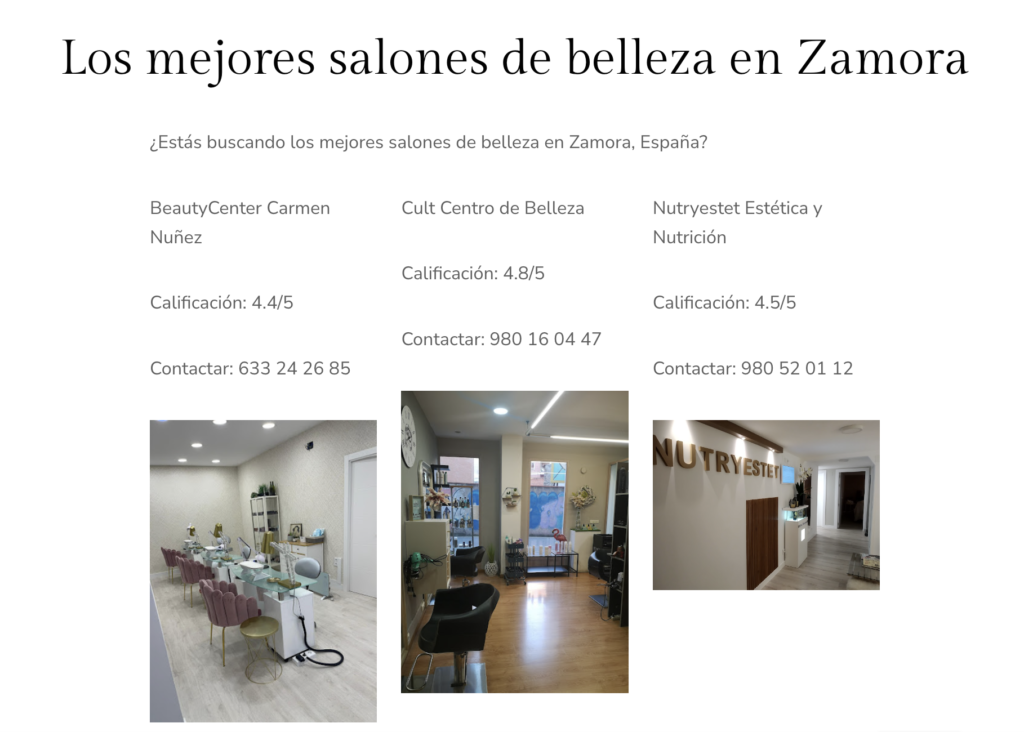
This is how the newly created page would look:
If you want to add styles to accommodate all the businesses on the location page created with this programmatic SEO tool, you just need to edit the template and add blocks or other design features.
Create a cornerstone or silo page
Additionally, what I would do is create a new page on the website. Go to “Page,” then “Add New Page,” and call this something like “Best hairdresserss.” When I say a cornerstone page, I mean a page similar to Three Best Rated’s “Local Businesses in Barcelona” page. They cover various niches, but I would focus on something like “Best hairdressers in Spain.”
For example, you could write: “Are you looking for a local beauty salon? Browse our locations below.” Then, create a bulleted list with exact match anchors: “hairdressers in Barcelona,” “hairdressers in Zamora,” “hairdressers in Madrid,” etc. Hyperlink each of these to the corresponding URLs from your project.
Here’s how you can do it:
- Go to your MPG project.
- Copy the URL for each location.
- Create a bulleted list in your cornerstone page.
- Hyperlink each location name to its respective URL.
- Format the text as needed, like bolding the location names.
Promoting your pages
Next, start building backlinks to your cornerstone page. This will help all the linked location pages gain authority. Submit the sitemap to ensure Google indexes these pages. MPG creates a separate sitemap for each project, which won’t be included in your Rank Math or Yoast sitemap by default.
To submit the sitemap:
Click “Sitemap” in the MPG plugin.
Name the sitemap, such as “beauty salons” or “Spain beauty salons.”
Click “Save and Generate.”
For example, your sitemap might be named “Spain beauty salons.xml.” Open this file to see all the URLs. Submit this sitemap in Google Search Console to help Google index and rank the pages.
For example, your sitemap might be named “https://example.com/mpg-sitemap-plumbing-services.xml.”
Open this file to see all the URLs. You will see a list of all of the pages that have been created.
Submit this sitemap in Google Search Console to help Google index and rank the pages. To do that, go over to Google Search Console, then Add a new sitemap and then paste the URL of the sitemap to add it. You will submit a new sitemap, but don’t worry it will not override the main one that you probably had with the rest of the pages of your site.
SEO Strategy
After submitting the sitemap, focus on ranking your pages for different locations. For example, if targeting “hairdressers Zamora,” start building links to that specific page. You can use various methods such as:
Forums
This process will help rank your pages effectively.
My take-aways on programmatic SEO
This is the process of creating and ranking location pages using plugins like MPG and CPT UI to create custom post types. I hope this guide on generating location pages with programmatic SEO was useful. There are many projects you can develop with this technology. I will soon write a post on different strategies to implement programmatic SEO. For now, these are some guides on programmatic SEO that you might find useful for your project:
What is programmatic SEO and how to use it to boost your marketing efforts.
Programmatic SEO with ChatGPT: A Real Case Study that Boosted Rankings
The best examples of programmatic SEO
The best programmatic SEO strategies for monetisation
If you have further business ideas on how to monetise content generated with programmatic SEO, do let me know. You can find me on X and Instagram.
Stay whisker-tuned for my next purr-fect marketing update!
Moxie